
Total Man Review – My 7-Month Experience, Full System Breakdown, Strategy, Packages and Results
Table of Contents
Quick Characteristics (Line-by-Line)
Packages:Rod Extender Kit, Vacuum Extender Kit, Compression Hanger Kit, Ultimate Package
Type: Modular traction system
Methods: Vacuum, rod extender, compression hanging, ADS
Purpose: Length increase, girth support, tissue elasticity
System: Multi-device training approach
Daily use: 2–8+ hours depending on stage
Skill level: Beginner to advanced
Price range: $60 to $199+ depending on kit
Core advantage: Combination of multiple stretching methods
Strategy: Growth phase + retention phase
Timeline: 3–6+ months for visible results
Best option: Full system approach instead of single device
Official site: totalmanshop.com
What Is Total Man System
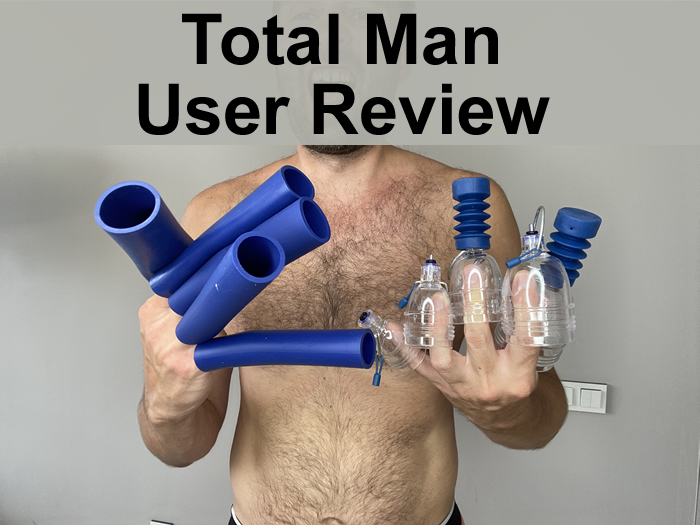
Total Man is not a typical penis extender. It is a complete system built around the idea that no single device is enough to produce optimal results. Instead of relying on one method, it combines multiple types of mechanical stress to stimulate tissue adaptation from different angles.
Most devices on the market fall into one category. Either they are rod-based extenders or vacuum systems. Total Man takes a different approach. It combines vacuum traction, compression hanging, rod extension and long-duration stretching into one structured framework.
This is what makes it fundamentally different. You are not buying a product. You are building a system.
The logic is simple. Tissue growth is not only about applying force. It is about applying the right type of force at the right time and allowing recovery and adaptation. This system tries to cover that entire process.
If you look at how people usually fail with extenders, it is because they use one method repeatedly without variation. Total Man solves this by giving you multiple tools that serve different purposes.
If you want to see the full system and available kits, you can check it here
How the System Actually Works
At its core, Total Man is based on progressive mechanical tension. But what matters is how that tension is applied.
There are two key phases that define the entire process.
Phase 1 – Expansion
This is where you apply higher levels of tension to stimulate tissue growth. Devices used here are:
- compression hanger
- rod extender
- vacuum hanging systems
These create stress that forces tissue to adapt. Sessions are usually shorter but more intense.
Phase 2 – Retention
This phase is often ignored in most systems, but it is critical. After expansion, the tissue needs to stay extended for long periods so that the body adapts to the new length.
Devices used here:
The tension here is lower but duration is much longer.
The real strength of Total Man is that it combines both phases into one routine. Most devices only address the first phase. That is why many users plateau.
Full Breakdown of All Packages
One of the biggest advantages of Total Man is flexibility. You can start small or go all-in.
All Day Stretcher and Vacuum Hanging Kit
This is usually the starting point for most users. It is designed for long wear, often several hours per day.
What it includes:
- vacuum chamber
- manual pump
- adjustable straps
- sealing and comfort components
This device is not about intensity. It is about duration. You wear it while working, walking or doing normal daily activities.
Best for:
- beginners
- building consistency
- retention phase
This is the most important tool for long-term progress because it allows hours of stretching without discomfort.
Compression Hanger Kit – $69
This is where things become more advanced. The compression hanger applies strong tension over short sessions.
What it includes:
- clamp system
- straps or weights
- silicone protection
Sessions usually last 15 to 30 minutes.
This method is more aggressive and requires proper technique. If used correctly, it can accelerate progress significantly.
Best for:
- experienced users
- growth phase
- increasing intensity
This is not something you start with, but it becomes important once your body adapts.
Rod Extender Kit – $79
This is the classic traction method. It uses adjustable rods to apply constant tension.
What it includes:
- base ring
- metal rods
- tension adjustment system
- comfort padding
This is the most predictable and controlled method.
Best for:
- structured sessions
- gradual progression
- combining with other methods
It sits between beginner and advanced level. It is not as easy as ADS, but not as aggressive as hanging.
Vibration and Recovery Devices
These are often underestimated, but they play a key role in recovery.
Their function is:
- improving blood flow
- reducing fatigue
- helping tissue adapt faster
They are not primary growth tools, but they support the entire process.
Ultimate Package – $150
This is the full system. It includes multiple devices and accessories in one set.
You get:
- vacuum systems
- rod extender
- compression tools
- accessories and sleeves
This package is designed for users who want to follow the full strategy from day one.
Instead of guessing what to buy next, you already have everything.
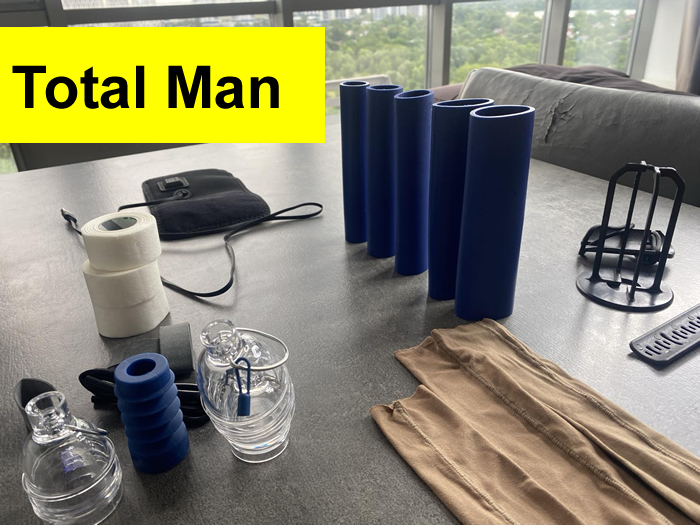
Accessories and Spare Parts
This is something most people underestimate.
The system includes and relies on:
- silicone sleeves
- comfort pads
- sealing rings
- straps and bands
- tapes and grip materials
These are not optional extras. Without them, consistency becomes difficult.
One advantage of Total Man is that you can replace individual parts. You do not need to buy a new system if something wears out.
Build Quality and Materials
The system is built with durability in mind.
Materials include:
- reinforced plastics
- metal rods
- silicone components
- strong textile straps
The modular design is a major advantage. Instead of one fixed device, you have interchangeable components.
From my experience, the build quality is solid. It is not luxury-level, but it is functional and reliable. The focus is clearly on usability rather than aesthetics.
First Impressions and Learning Curve

When you first receive the system, it can feel overwhelming.
There are multiple components, and it is not immediately obvious how everything fits together.
This is the main downside. There is a learning curve.
However, once you understand:
- what each device does
- when to use it
- how to combine them
…the system becomes much easier to manage.
After about one week, the routine starts to feel natural.
Who Should Use Total Man
This system is ideal for people who are ready to follow a structured routine.
It works best for:
- users who want a complete system
- those willing to invest time daily
- people who want long-term results
It is not suitable for:
- those looking for quick results
- users who want a simple one-device solution
- people unwilling to commit to daily routines
Reality of Results
This is not a fast process.
The timeline looks like this:
- Month 1 to 2: adaptation phase
- Month 3 to 4: first visible changes
- Month 5 to 7: measurable results
Consistency is the key factor. The system works, but only if you follow the routine.
Starting Recommendation
If you are serious about results, starting with the full system makes the most sense.
It allows you to:
- test different methods
- build a complete routine
- avoid buying parts separately
You can check the full setup here totalmanshop.com
My 7-Month Routine, Strategy, Results and Mistakes
My 7-Month Experience with Total Man System
When I first started using the Total Man system, I made the most common mistake — I tried to use everything at once.
I had:
- a compression hanger
- a rod extender
- a vacuum system
So my logic was simple: more tools equals faster results.
That approach failed.
What I learned quickly is that this system is not about intensity. It is about structure. If you overload the tissue too early, you do not accelerate growth — you slow it down.
Real progress only started when I broke everything down into stages and followed a clear progression.
Stage 1 – Adaptation Phase (Month 1–2)
The goal of this stage is not growth. The goal is conditioning.
Your tissue needs time to adapt to constant tension. Without this phase, every advanced method will feel uncomfortable or even counterproductive.
What I used:
- All Day Stretcher as the main tool
- occasional rod extender sessions
- no hanging at all
My routine:
- 2 to 4 hours per day
- very low tension
- focus on comfort, not intensity
The first 7 to 10 days felt unusual:
- constant pressure
- unfamiliar stretching sensation
- mild fatigue
This is normal.
The biggest mistake at this stage is increasing tension too quickly. Many people think discomfort means progress. In reality, discomfort at this stage usually means you are doing too much.
Key takeaway:
If you rush this phase, everything that comes after becomes less effective. Proper adaptation is what allows you to scale intensity later.
Stage 2 – Structured Growth Phase (Month 3–4)
This is where things start to change.
At this point, your body is already adapted to basic tension, so you can begin combining different methods.
What I added:
- rod extender for controlled tension
- vacuum system for additional variation
- light introduction to compression hanging
My routine looked like this:
- morning: 1 to 2 hours with rod extender
- daytime: 3 to 5 hours with all day stretcher
- evening: short, low-intensity hanging sessions
This combination is critical.
Most users either stay too long in low-intensity stretching or jump straight into aggressive hanging. Both approaches limit progress.
You need both controlled tension and long-duration stretching.
What I noticed during this stage:
- tissue became noticeably more elastic
- tension felt easier to handle
- recovery time improved
- I could increase load without discomfort
This is the stage where you start to feel that the system is actually working.
Stage 3 – Expansion Phase (Month 5–7)
This is where real results begin.
By this point, your body is fully adapted, and you can safely increase intensity.
What I used regularly:
- compression hanger (primary growth tool)
- rod extender (supporting method)
- all day stretcher (retention phase)
My full routine:
- compression hanger: 20 to 30 minutes
- rod extender: 1 to 2 hours
- all day stretcher: 3 to 6 hours
The key difference in this phase is how you manage load.
More is not better. Smart progression is better.
I started using cycles:
- 3 to 4 days of increasing load
- 1 day of reduced tension or full rest
This made a huge difference.
Without recovery, your body adapts slower. With proper cycling, progress becomes more consistent.
What changed during this stage:
- tension tolerance increased significantly
- sessions became more efficient
- visible progress became measurable
This is where the system shows its full potential.
Which Package to Choose
Which Total Man Package Should You Choose
This is where most people get confused. The system offers multiple kits, and without a clear plan, it is easy to either overspend or choose the wrong entry point.
The key is simple: choose based on your stage, not your ambition.
Beginner Level (Month 1–2)
If you are starting from zero, you do not need everything.
The best option is:
All Day Stretcher and Vacuum Hanging Kit
Why this works:
-
it allows long-duration stretching
-
it builds adaptation safely
-
it is comfortable enough for daily use
At this stage, your only goal is consistency. You need something you can wear for several hours without discomfort.
Avoid:
-
compression hanger
-
aggressive tension
-
complex routines
This phase determines how successful your next stages will be.
Intermediate Level (Month 3–4)
Once your body adapts, you need to increase complexity.
At this stage, the best combination is:
-
rod extender
-
all day stretcher
-
optional light vacuum sessions
Now you start building structure.
You are no longer just stretching. You are controlling tension and combining methods.
This is where many users plateau because they stay too long in beginner mode.
Advanced Level (Month 5+)
This is where the full system becomes necessary.
Best setup:
-
compression hanger
-
rod extender
-
all day stretcher
-
recovery tools
At this level, your goal is not just consistency. It is optimization.
You rotate methods, increase intensity, and introduce cycles.
Ultimate Package – The Smart Choice
If you want to skip all the guesswork, the Ultimate Package is the most efficient option.
It includes:
-
vacuum systems
-
compression tools
-
rod extender
-
accessories
Why it makes sense:
-
you save money compared to buying separately
-
you have all tools from day one
-
you can build your routine without limitations
If you are serious about results, this is the best starting point totalmanshop.com

Dr. Curtis works in New York, NY and specializes in Urology. Dr. Curtis works in a New York Lower Manhattan Hospital.